Digital evidence preservation is critical for ensuring electronic data remains intact and admissible in legal proceedings. This process involves securing data, maintaining integrity, and documenting every access point. Failure to follow proper procedures can lead to evidence being excluded in court, regulatory penalties, or weakened investigations.
Key Takeaways:
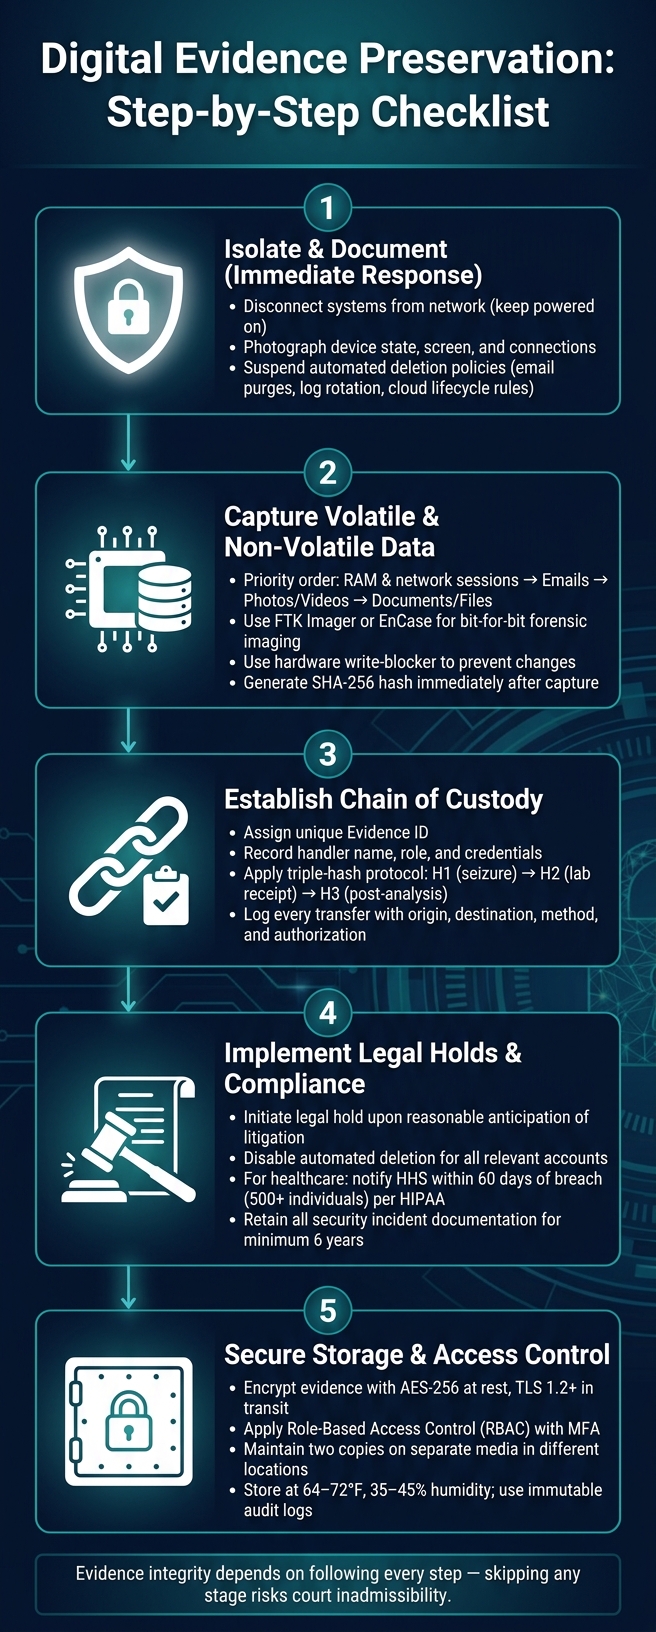
- Preserve data immediately: Isolate systems, suspend automated deletions, and prioritize volatile data like RAM and network sessions.
- Use forensic tools: Tools like FTK Imager or EnCase create exact disk images and verify data integrity with SHA-256 hashes.
- Maintain chain of custody: Document every evidence transfer with unique IDs, timestamps, and hash verifications.
- Healthcare-specific steps: Freeze short retention logs, secure PHI, and avoid self-collection to meet HIPAA requirements.
- Secure storage: Use tamper-evident measures, role-based access, and AES-256 encryption to protect evidence.
Proper evidence handling ensures compliance with legal and regulatory standards, especially in sensitive fields like healthcare. Start with these steps to safeguard data and maintain its admissibility in court.
Digital Evidence Preservation Checklist: Step-by-Step Process
Digital Evidence Preservation & Chain of Custody
Immediate Evidence Preservation Steps
The first few moments after an incident are critical for ensuring evidence remains usable in court. Every decision made during this time can determine whether the evidence is admissible or dismissed.
"A forensic examination is only as good as the data behind it, and if that data isn't collected properly, preserved defensibly, and documented thoroughly, even the most compelling findings can be challenged or excluded." - Lance Sloves, CCE, Computer Forensic Services, Inc. [5]
Isolate and Secure Affected Systems
The first step is to isolate the affected systems to prevent further tampering, especially remotely. Disconnect them from the network, but keep them powered on to preserve volatile RAM data. Before interacting with the system, document everything: take photos of the device, note its current state (on/off), screen display, and connection setup. This visual and written record is essential for maintaining a strong chain of custody.
A critical but often overlooked step is to suspend automated data destruction policies immediately. These include email deletion schedules, log rotation, and cloud storage lifecycle rules. Such automated processes don’t differentiate between routine files and potential evidence, and neglecting to pause them can lead to irreversible data loss.
Once systems are isolated and documented, the next priority is capturing both volatile and non-volatile data.
Preserve Volatile and Non-Volatile Data
After isolating the system, focus on preserving evidence in order of its volatility. Volatile data - such as RAM contents, active network sessions, and running processes - disappears once the system is powered down. Non-volatile data, like disk images and system logs, is less transient but still at risk of being overwritten. Always prioritize the most ephemeral data first.
| Evidence Type | Volatility | Key Preservation Requirement |
|---|---|---|
| RAM, network sessions, running processes | Very High | Immediate acquisition before shutdown [1] |
| Emails and messages | Medium-High | Full headers, routing paths, and server metadata [1] |
| Photos and videos | Medium | Preserve EXIF metadata and generate a hash [1] |
| Documents and files | Low | Original format, creation/modification metadata, and hash [1] |
For capturing memory snapshots and creating disk images, rely on forensic tools like FTK Imager or EnCase. These tools generate a bit-for-bit copy of the storage medium, including unallocated space and deleted files, ensuring nothing is missed [1]. Use a hardware write-blocker during this process to prevent any accidental changes to the original data [1][5].
Once the data is captured, generate a SHA-256 hash immediately. This hash acts as a digital fingerprint for the evidence. Record the hash value, the tool used, the exact timestamp, and the name of the individual who performed the acquisition. This documentation is a crucial part of the chain of custody.
With both volatile and non-volatile data secured, the next step is to establish and rigorously follow chain of custody protocols.
Establishing and Maintaining Chain of Custody
After capturing and hashing your evidence, the next hurdle is ensuring that it remains untampered from collection to courtroom. Research highlights that the absence of a documented chain of custody (CoC) is one of the main reasons digital evidence gets excluded during court proceedings [7]. In fact, many cases fail not because of technical flaws but due to procedural oversights. As Gavelchain puts it: "Digital evidence fails in court more often due to process gaps than technical flaws" [8].
How to Document Evidence Handling
Every step in handling evidence needs proper documentation. A thorough chain of custody should include these five essential fields:
| Required CoC Form Field | Description |
|---|---|
| Evidence ID | A unique identifier for the evidence |
| Handler Identification | Details of each person who accesses the evidence, including name, role, and credentials |
| Hash Value | The SHA-256 fingerprint generated at acquisition and verified during every transfer |
| Transfer Record | A log of all handoffs, including the origin, destination, method, and authorization |
| Context Metadata | Information like the device used, operating system, GPS coordinates, and network details |
A key point: the hash must be created at the time of collection, not afterward. If the hash is added later, it cannot confirm that the evidence remained unchanged during its initial handling. To ensure integrity, use a triple-hash protocol: generate a hash at seizure (H1), again when the lab receives it (H2), and once more after analysis (H3). Any mismatch between these hashes signals potential tampering [9].
Automated tools, such as Censinet RiskOps™, can simplify this process by generating immutable audit trails that make it easier to manage compliance and evidence handling [3]. These steps are the cornerstone of adapting chain of custody protocols to specific environments, like healthcare.
Chain of Custody Best Practices for Healthcare
Healthcare environments often face unique challenges when managing digital evidence, requiring tailored approaches. Clinical systems cannot always be powered down, Protected Health Information (PHI) must remain secure, and older medical technologies may need specialized tools for imaging.
| Healthcare Forensic Challenge | Mitigation Steps |
|---|---|
| Clinical Uptime | Use logical isolation or live imaging instead of shutting systems down |
| Short Log Retention | Immediately freeze EHR and VPN logs - note that M365 audit logs typically retain data for only 90 days under standard licenses [5] |
| Legacy Systems | Employ DICOM/PACS viewers or HL7/FHIR log parsers to handle older medical technology |
| PHI Privacy | Implement role-based access control (RBAC) tied to specific cases, avoiding broad folder access |
In healthcare, documenting "break-glass" events is crucial. These are emergency access instances to EHR systems during an incident. Such events must be logged explicitly to differentiate legitimate clinical needs from suspicious activity. Additionally, ensure that Business Associate Agreements (BAAs) are in place with forensic vendors before sharing any evidence, as this is a key requirement for HIPAA compliance.
Lastly, one golden rule in healthcare: custodians should never collect their own data. Self-collection alters metadata and introduces a conflict of interest, which opposing counsel could exploit [2][5].
Collection Methods for Different Evidence Types
How you collect evidence matters just as much as what you collect. A single mistake - like failing to save files correctly, skipping hash generation, or leaving a device connected - can compromise the entire process.
System Logs and Disk Images
A regular backup only captures active files, while a forensic image goes much deeper. It creates a bit-by-bit replica of the entire storage medium, including deleted files, unallocated space, and system logs that routine backups miss.
"A forensic image captures everything on the storage media, including deleted files, system logs, application databases, and metadata that never appears in a standard backup." - Computer Forensic Services, Inc. [2]
| Feature | Standard Backup | Forensic Image |
|---|---|---|
| Deleted Files | Not captured | Captured from unallocated space |
| System Logs | Often excluded | Fully captured |
| Integrity Proof | None | Cryptographic hash (SHA-256/MD5) |
| Court Admissibility | Low | High |
To ensure accuracy, tools like FTK Imager or EnCase are essential for creating forensic images. Always use a hardware write-blocker during this process to prevent accidental changes. Once the image is complete, generate a SHA-256 hash immediately to confirm its integrity.
It's also crucial to suspend automated log rotations and scheduled purges as soon as the investigation begins. These processes can overwrite critical records without notice. Instead of assuming a legal hold will handle this, contact IT directly to pause these operations.
Now, let’s dive into the specific challenges of collecting evidence from cloud systems and endpoints.
Cloud and Endpoint Data
Cloud and endpoint evidence can be tricky due to its distributed nature and the risk of data loss from platform retention limits. For instance, Microsoft 365 audit logs have a 90-day retention window, which means acting quickly is essential [5].
To preserve cloud evidence, download files immediately and use platform-level holds, such as Microsoft Purview, to freeze data and prevent automatic deletion. Capture Unified Audit Logs to keep track of who accessed what and when. Don’t forget to check "Recoverable Items" folders for messages that may still be retrievable after deletion. When dealing with email evidence, always save full headers and routing metadata, as these are crucial for proper authentication.
For endpoint evidence, mobile devices should be placed in Faraday bags to block remote wipe commands [6]. If the system is still running and might be encrypted, prioritize live RAM capture to retrieve decryption keys before shutting it down. Lance Sloves, CCE at Computer Forensic Services, Inc., explains:
"A forensic collection... creates an exact, bit-for-bit image or a verified export of the source data, documents the process with detailed notes and hash verification, and preserves everything - including the artifacts that most people don't even know exist." [5]
Finally, ensure all collected cloud and endpoint data is hash-verified and meticulously documented to maintain a solid chain of custody. For cloud-connected endpoints, like those using OneDrive, analyze local sync logs after deletion. These logs often contain details about file downloads and removals, which can be critical for your investigation.
sbb-itb-535baee
Legal and Regulatory Considerations
After gathering and documenting your evidence, it's crucial to navigate the legal requirements surrounding it. Even the most meticulously preserved forensic data can become useless if legal hold protocols are ignored or HIPAA deadlines are overlooked. Knowing these rules ahead of time can mean the difference between a defensible response and one that leads to costly repercussions.
How to Implement Legal Holds
Legal holds must be initiated as soon as there is any expectation of litigation, whether it stems from internal complaints or regulatory investigations.
"The moment an organization has reason to expect litigation... a duty arises to stop the routine deletion of potentially relevant data." - Kandi Brian, Cybersecurity Instructor [4]
"A litigation hold letter is a legal directive - not a technical safeguard - which emphasizes the need to disable automated deletion processes immediately." - Computer Forensic Services, Inc. [2]
Failing to properly implement legal holds can result in irreversible evidence loss and severe legal penalties. For example, in Apple Inc. v. Samsung Electronics Co. (N.D. Cal., July 2012), Samsung issued hold notices but did not disable its automatic email deletion system. This oversight led to the permanent loss of important emails, resulting in adverse inference instructions from the court [4]. Similarly, in MOSAID Technologies v. Samsung Electronics Co. (D.N.J.), the failure to enforce a litigation hold caused the destruction of critical evidence, leading to monetary sanctions [4].
To ensure a defensible legal hold, collaborate with IT teams to disable automated deletion processes, such as email purging, log rotation, and cloud storage lifecycle rules, for all relevant accounts. Under FRCP Rule 37(e), failing to preserve electronically stored information (ESI) can result in monetary penalties, adverse inferences, or even case dismissal [1]. It’s equally important to track which custodians receive hold notices and confirm compliance with follow-ups.
For healthcare organizations, these obligations extend beyond legal holds and into HIPAA compliance during breach investigations.
HIPAA and Breach Notification Requirements
In healthcare, failing to enforce legal holds can directly impact compliance with HIPAA's breach notification mandates. Preserving evidence isn’t just about litigation - it’s also a regulatory necessity. HIPAA requires covered entities to notify the Department of Health and Human Services (HHS) and affected individuals within 60 days of discovering a breach involving 500 or more individuals [12]. The speed and precision of your forensic investigation play a critical role in meeting this timeline.
HIPAA’s four-factor risk assessment helps determine whether notification is required by examining the type of data accessed, the identity of the unauthorized party, and the duration of access [12]. Furthermore, all documentation related to security incidents and responses must be retained for at least six years [12].
"Forensics outputs should map directly to HIPAA compliance expectations: safeguard PHI, prove the scope of unauthorized access, and document your decisions." - Kevin Henry, Incident Response, Accountable [10]
During an investigation, apply HIPAA’s minimum necessary standard by restricting access to Protected Health Information (PHI) to only what is essential for the forensic analysis [11]. If third-party vendors handle PHI, ensure their responsibilities are clearly defined in Business Associate Agreements (BAAs). These agreements should outline their role in evidence sharing and remediation [10]. Overlooking gaps in BAAs can expose organizations to compliance risks, particularly when breaches involve multiple systems or vendors.
| Requirement | Deadline / Timeframe | Governing Standard |
|---|---|---|
| Breach notification to HHS & individuals | Within 60 days of discovery (500+ individuals) | HIPAA Breach Notification Rule [12] |
| Security incident documentation retention | Minimum 6 years | HIPAA Security Rule [12] |
| ESI preservation (litigation hold) | Triggered by reasonable anticipation of litigation | FRCP Rule 37(e) [1][4] |
| Evidence authentication | Required before court admissibility | FRE Rule 901 [1] |
Secure Storage and Access Control for Preserved Evidence
Once digital evidence is collected and placed under legal hold, ensuring its secure storage and managing access are critical steps to maintain its integrity for court proceedings. Interestingly, evidence is often excluded not for its content but due to issues with how it was stored or accessed [1].
Tamper-Evident Storage Solutions
Every piece of evidence, whether physical or digital, must have safeguards that immediately highlight any unauthorized tampering. For physical evidence, use tamper-evident markers - such as initials, dates, and serial numbers - and document these in the chain of custody [13].
For digital evidence, creating a cryptographic hash upon collection is essential. Re-verify the hash with every transfer; even the smallest change will result in a mismatch, signaling potential tampering [13].
"A single undocumented step, a file transferred via email without a cryptographic hash, a photo saved without original metadata: any one of these gaps is enough to destroy the evidentiary value of a digital asset." - Fabio Ugolini, CEO, TrueScreen [1]
Storage media also play a key role. Enterprise SSDs, for example, can lose data if left unpowered for as little as three months [13]. For long-term storage, opt for M-DISC or archival-grade CD-R/DVD-R, which can last 30 to 100 years [13]. Mobile devices should immediately be placed in Faraday bags - airplane mode alone is insufficient as it can be overridden by malware or the operating system [9].
Physical storage areas must be secure and access-controlled, with every entry logged. Environmental conditions should be tightly regulated - keep the temperature between 64–72°F and humidity at 35–45%, monitored every 15 minutes with calibrated data loggers. Any deviations must be documented to remain defensible in court [13].
Access Logs and Permissions
Manually logging access to evidence is unreliable. Instead, use immutable audit logs that record every interaction, including the identity of the person accessing the evidence, the timestamp, the type of action, and the source IP [3][6]. These logs ensure the chain of custody is upheld.
Access should be tightly controlled using Role-Based Access Control (RBAC). Permissions should only be granted based on specific case assignments and automatically revoked when cases close or employees leave. Implement multi-factor authentication (MFA) at the platform level to further secure access. This approach minimizes the risk of "orphaned permissions", which can leave evidence vulnerable.
"Protection is the active layer... Encryption, role-based access, integrity verification, audit logging... Preservation is the durable outcome. It is keeping evidence intact, authentic, and legally admissible across its entire retention period." - Bassam Mazhar, Product Marketing Executive, VIDIZMO [3]
Consumer cloud storage platforms are not suitable for evidence storage because they lack case-specific access controls and verifiable integrity checks [3]. Instead, all evidence should be encrypted using AES-256 at rest and TLS 1.2+ in transit, with encryption keys stored separately from the data [3].
Evidence Retention and Backup
Retention isn't just about keeping evidence - it’s about ensuring it remains accessible and verifiable for as long as required by law. For example, HIPAA mandates a minimum six-year retention period for security incident documentation, but litigation holds may extend this timeframe [12].
To safeguard evidence, maintain two copies of each forensic image on separate storage media located in different locations [13]. Use automated retention schedules to avoid "retention drift", where evidence unintentionally expires before its legal hold period ends [3].
A practical guideline to follow is the "five-minute rule": any piece of evidence should be locatable, retrievable, and re-filed within five minutes. If this standard isn’t met, it may indicate undocumented access [13].
| Storage Condition | Acceptable Range | Standard |
|---|---|---|
| Temperature | 64–72°F | NIST IR 8387 [13] |
| Relative Humidity | 35%–45% | NIST IR 8387 [13] |
| Magnetic Field Limit | Under 100 lbs. of pull | NIST IR 8387 [13] |
| SSD Retention (Unpowered) | ~3 months (enterprise minimum) | JEDEC Standards [13] |
| Archival Disc Lifespan | 30–100 years | NIST IR 8387 [13] |
Healthcare organizations, in particular, must adhere to strict regulations when managing digital evidence. Platforms like Censinet RiskOps™ can simplify these processes by improving audit logging, streamlining risk management, and ensuring compliance with standards like HIPAA.
Conclusion
This checklist provides a clear and organized method for safeguarding digital evidence. The process starts right at incident detection and continues through to meeting all legal requirements. Each step - whether isolating systems, capturing volatile data, applying SHA-256 hashing, or maintaining a detailed chain of custody - plays a critical role in preserving the integrity of the evidence.
"The difference between evidence that holds up in court and evidence that gets excluded lies in the quality of the preservation process." - Fabio Ugolini, TrueScreen [1]
Healthcare organizations, in particular, face unique hurdles with HIPAA compliance, EHR audit trails, and the complexity of medical logs. A structured checklist transforms these high-stakes scenarios into manageable, repeatable processes. By following this approach, teams can confidently handle regulatory reviews and legal challenges. Tools like Censinet RiskOps™ further support healthcare organizations by streamlining risk management, coordinating third-party responsibilities, and ensuring proper documentation standards are met for regulatory compliance.
FAQs
What should I capture first when an incident is discovered?
When an incident is identified, the first step is to stabilize the situation while ensuring evidence remains intact. Start by capturing volatile data - such as RAM - right away, as this information disappears when the device is powered down. Take photographs of the physical setup, the current state of devices, and any visible screens to preserve a clear record of the scene.
Next, pinpoint potential evidence sources and begin maintaining a timestamped case log to track all actions. Adjust log retention policies to accommodate the investigation, and meticulously document every step you take during these critical early stages.
How do I prove digital evidence wasn’t altered after collection?
To ensure digital evidence remains untampered, it's crucial to establish its integrity through cryptographic hashing and a well-documented chain of custody. Start by generating a unique hash value, such as SHA-256, when the evidence is acquired. This hash acts like a digital fingerprint for the data. Later, if the hash matches the one recorded during collection, it confirms that the evidence hasn't been altered.
Additionally, use hardware write-blockers during the collection process. These devices prevent any accidental changes to the original media, ensuring the evidence remains in its original state. Together, these steps provide a reliable method for maintaining the authenticity of digital evidence.
What extra steps are required when evidence includes PHI?
When handling digital evidence that contains protected health information (PHI), healthcare organizations face the dual challenge of meeting both privacy regulations and legal requirements. To navigate this, a few critical steps are essential:
- Forensic imaging: This ensures an exact replica of the digital evidence is preserved for analysis without altering the original data.
- Chain of custody documentation: Properly tracking who accesses the evidence and when is crucial for maintaining its integrity.
- Litigation holds: Implementing holds ensures that relevant data is preserved during legal proceedings.
Platforms like Censinet RiskOps™ can simplify this process by integrating PHI management into broader cybersecurity and risk strategies. This not only supports defensible evidence handling but also protects sensitive healthcare data from potential breaches.
When do I need to start a legal hold?
A legal hold should kick off the moment your organization can reasonably foresee litigation, a formal dispute, or an investigation. This responsibility arises when credible threats emerge - think demand letters, regulatory inquiries, or serious internal complaints. Delaying until formal legal action is initiated increases the risk of losing critical evidence. Solutions like Censinet RiskOps™ can assist healthcare organizations in managing risks and maintaining proper evidence preservation practices.
How should I store digital evidence long-term without integrity loss?
To ensure digital evidence remains intact over the long term, opt for offline storage solutions such as magnetic tape, dedicated hard drives, or recordable optical media like CD-Rs or DVD-Rs. Avoid using SSDs for this purpose, as they need periodic power to retain data.
It's crucial to maintain a well-documented chain of custody and regularly verify data integrity using cryptographic hashes. Additionally, store the evidence in an access-controlled, encrypted environment, keeping a detailed log of all lifecycle actions. Tools like Censinet RiskOps™ can be particularly useful for healthcare organizations aiming to manage data security and integrity efficiently.
