
I use component scanning to flag known weaknesses and penetration testing to check whether an attack path works. For medical devices, I recommend both: check the delivered firmware and SBOM, then test priority paths on representative devices outside active patient care.
Here’s how I put the results to work:
- Scan: Match components and versions against vulnerability records, supplier advisories, and support dates.
- Test: Check interfaces, access controls, updates, and connected systems within written scope and safety limits.
- Prioritize: Weigh exposure and possible patient harm - not severity scores alone.
- Verify: After a fix, check security and clinical function. Track remaining risk, owners, approvals, and retest dates.
Neither a clean scan nor a clean test proves a device is secure. The FDA identifies 4 cybersecurity testing categories; scanning and penetration testing do not replace the full testing program.
Quick Comparison
| Criteria | Component scanning | Device penetration testing |
|---|---|---|
| Goal | Find known component weaknesses | Test attack paths and controls |
| Inputs | SBOM, versions, configurations, advisories | Threat model, scope, access, safety rules |
| Approach | Mostly automated, with review | Human-led, with tools |
| Findings | Vulnerability matches and unsupported software | Tested exploits, bypasses, and attack chains |
| Time and resources | Usually faster; supports fleet review | Usually slower; needs specialist testers |
| Main limits | Inventory gaps, false positives, unknown flaws | Scope, time, access, and test setup |
| Safety | Active scans can disrupt devices | Requires strict safeguards and stop conditions |
| Timing | Repeat after updates and new advisories | Repeat after material changes or high-risk findings |
My bottom line: <u>use both results to guide medical device risk management decisions</u> - and confirm that each security change leaves clinical function intact.
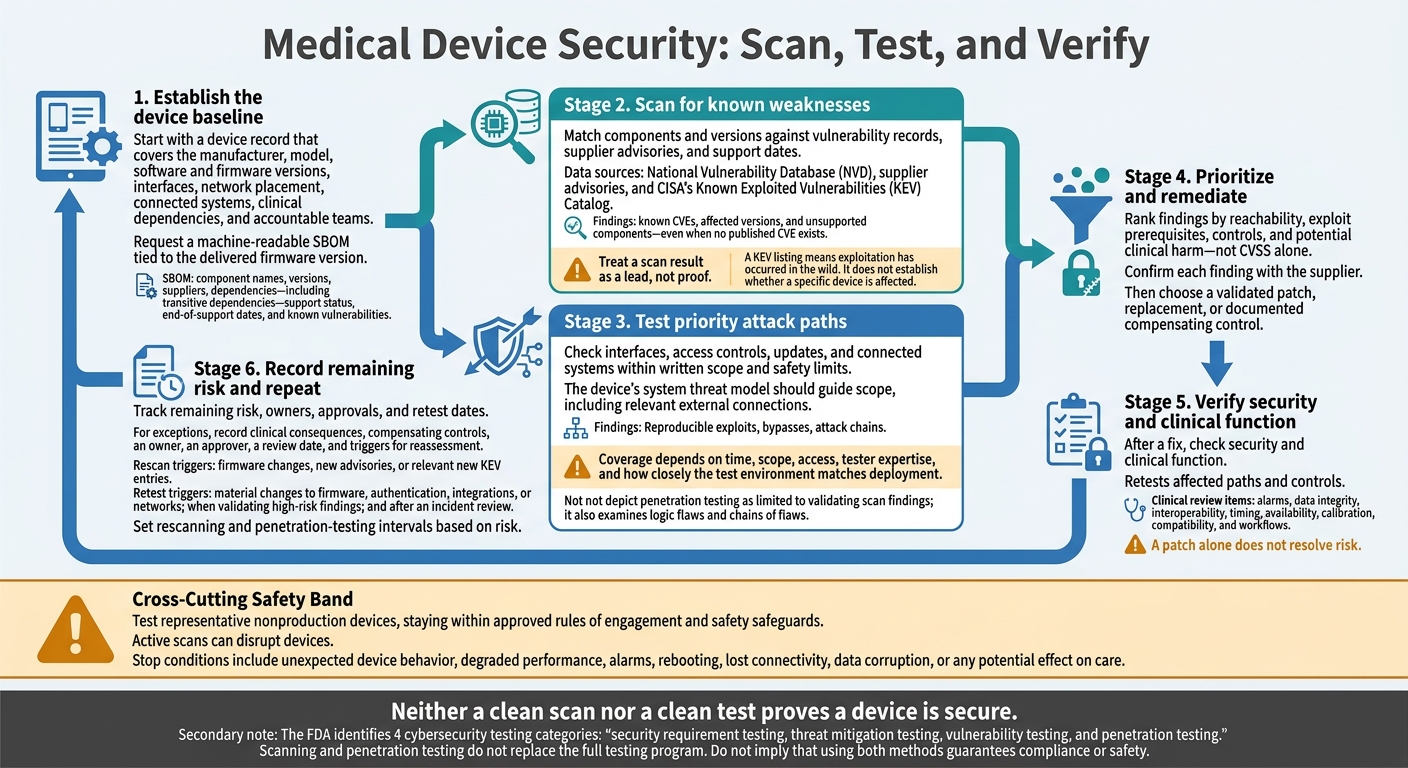
Medical Device Security: Scan, Test, and Verify
Component Vulnerability Scanning: Uses and Limits
Component scanning checks device software and firmware - operating systems, applications, libraries, open-source packages, commercial software, and dependencies - and matches their versions to known vulnerability records. Network scanning sees exposed ports and services. Component scanning can also identify software embedded in firmware.
SBOMs and Vulnerability Data
Request a machine-readable SBOM tied to the delivered firmware version. It should include component names, versions, suppliers, dependencies - including transitive dependencies - support status, end-of-support dates, and known vulnerabilities.
Check that inventory against the National Vulnerability Database (NVD), supplier advisories, and CISA’s Known Exploited Vulnerabilities (KEV) Catalog. A KEV listing means exploitation has occurred in the wild. It does not establish whether a specific device is affected.
If a complete SBOM isn't available, use binary analysis to identify recognizable components in firmware images and executables. Treat this analysis as a supplement, not proof that the inventory is complete. Encryption, stripped symbols, custom code, and static linking can leave gaps. Document those gaps.
Scan Findings and When to Scan
Scan findings can include known CVEs, affected versions, and unsupported components - even when no published CVE exists.
Manufacturers should scan during development, integration, and prerelease review. HDOs should review results during procurement and acceptance testing, then rescan after firmware changes, new advisories, or relevant new KEV entries.
Confirm each finding with the supplier. Then choose a validated patch, replacement, or documented compensating control. Base that choice on clinical use and exposure, not severity alone.
False Positives and Exploitability Limits
Scan accuracy depends on inventory quality, correct version identification, and current vulnerability data. A version match may overlook a vendor patch. An affected feature may also be disabled or unreachable.
Treat a scan result as a lead, not proof. Confirm whether it applies through supplier review, configuration checks, and reachability analysis.
Scanning can miss novel vulnerabilities, authentication logic flaws, and device-specific protocol weaknesses. Assess patient-safety impact separately by examining affected clinical functions and existing controls. When teams need to verify reachability and exploitability under actual use conditions, these limits call for attack-path testing.
sbb-itb-535baee
Device Penetration Testing: Scope and Safety
Medical-device penetration testing is a controlled, authorized attempt to prove exploitable weaknesses in a production-representative device, its software and firmware, and connected systems. It checks whether testers can reach and use a weakness through a realistic attack path or control bypass. FDA guidance identifies penetration testing as one part of cybersecurity testing.[1] In practice, pen testing checks whether scan findings are reachable and exploitable.
Interfaces and Attack Paths
Scope should cover network services, authentication and authorization, firmware updates, wireless connections, companion applications, cloud connections, device protocols, and USB or maintenance interfaces. Testers assess authentication bypass, privilege escalation, data access or manipulation without permission, and segmentation failures.
The device’s system threat model should guide scope, including relevant external connections.[2] Testers also examine logic flaws and chains of flaws that could lead to higher-impact compromise.[9] This defines which attack paths they can prove - not just which weaknesses they can name.
When to Test and What to Prepare
Start once the architecture and threat model are defined, then test a production-representative build before release. Retest after material changes to firmware, authentication, integrations, or networks; when validating high-risk findings; and after an incident review. Set a recurring testing schedule based on medical device security risks and exposure. A pre-release test is not permanent assurance.[5]
Before testing begins, obtain written authorization from every party controlling in-scope devices, environments, and connections. Match the test plan to the device’s threat model, interfaces, and deployment context. The rules of engagement must list:
- Device and firmware versions, IP ranges, applications, APIs, cloud services, and test accounts.
- Permitted techniques, prohibited actions, and testing windows.
- Communication channels, evidence handling, escalation contacts, and stop conditions.
Prepare these materials before work starts:
- Architecture and data-flow diagrams, asset and interface inventories, and the threat model.
- Known vulnerabilities, configuration details, test credentials, and logging access.
- Recovery images, backup and restore procedures, and clinical safety constraints.
Use qualified testers with relevant embedded, application, network, and wireless expertise. Give them enough independence to report findings objectively, and document methods, results, limitations, and unresolved findings.[6][8]
Testing Limits and Clinical Safeguards
A clean report does not prove that a device has no exploitable weaknesses. Coverage depends on time, scope, access, tester expertise, and how closely the test environment matches deployment.
Testing should generally take place in an isolated laboratory or staging environment that closely matches production. Use representative hardware, firmware, network segmentation, clinical integrations, and security configurations.
Reserve production testing for rare cases. It requires explicit authorization, a clinical risk review, a defined maintenance window, and real-time coordination with the responsible clinical and technical teams. Use synthetic or de-identified data.
Set stop conditions for unexpected device behavior, degraded performance, alarms, rebooting, lost connectivity, data corruption, or any potential effect on care. Keep known-good firmware, backups, and tested recovery procedures ready.[7] Within these limits, pen testing provides evidence that an attack path is reachable under controlled conditions after scanning - not general assurance.
Scanning vs. Pen Testing: Key Differences
Scanning finds known vulnerable components; penetration testing checks whether a defined attack path works.[1][12]
Comparison of Goals, Findings, and Limits
At the component level, the difference comes down to evidence. Scanning flags possible exposure. Pen testing checks whether an attacker can reach and use it.
| Comparison area | Component vulnerability scanning | Device penetration testing |
|---|---|---|
| Primary objective | Identify vulnerable components using inventory data | Test defined attack paths and whether controls work |
| Automation | Mostly automated, with analyst review | Human-led, with tool support |
| Inputs | SBOM, inventory, versions, configurations, vulnerability intelligence | Scope, rules of engagement, architecture, interfaces, credentials, safety constraints |
| Testing target | Libraries, firmware, operating systems, exposed services | Reachable interfaces, controls, connected-system interactions |
| Findings | CVE matches, unsupported components, exposed services, weak configurations | Reproducible exploits, bypasses, attack chains |
| Lifecycle timing | Recurring and triggered by changes | Scheduled at milestones and triggered by risk |
| Speed | Fast and scalable across fleets | Slower and requires more resources |
| Repeatability | High when inputs and rules stay consistent | Depends on scope, tester judgment, and environment |
| Exploitability assessment | Points to possible exposure | Can prove reachability or exploitation within scope |
| Clinical safety | Usually lower risk, though active scans can disrupt fragile devices | Requires strict safety controls |
| Main limitations | Incomplete inventory, outdated intelligence, false positives, unknown flaws | Narrow scope, limited time or access, differences between test and deployment environments |
Treat scan findings as possible exposure until you verify the component version, reachability, and any vendor backport.[4][5][11][13] A clean scan or a failed test does not prove a device is secure. Both results depend on the scope and coverage of the assessment.[11][12][13]
Keep scan and pen-test records separate for third-party risk review. Scan records should identify affected components, versions, and data sources. Pen-test records should document the paths tested, the access used, and the results.[10][12]
Using Both Methods in a Healthcare Risk Program
Bring scanning and penetration-testing results into one repeatable risk workflow.
From Device Inventory to Retesting
Start with a device record that covers the manufacturer, model, software and firmware versions, interfaces, network placement, connected systems, clinical dependencies, and accountable teams. Check the SBOM, advisories, and support status against the deployed build. Rank findings by reachability, exploit prerequisites, controls, and potential clinical harm - not CVSS alone. Document remediation and residual risk before retesting.[3][2]
Next, confirm that security changes don't weaken clinical performance. Check both security controls and clinical function. Clinical or biomedical engineering should review alarms, data integrity, interoperability, timing, availability, calibration, compatibility, and workflows. Set rescanning and penetration-testing intervals based on risk.[5]
Test Records and Accountable Teams
Keep a traceable evidence package for every assessment, and name an owner for each activity. Manufacturer documentation should cover the FDA’s four recommended testing categories: security requirement testing, threat mitigation testing, vulnerability testing, and penetration testing.[2] Neither method alone proves compliance or safety in every situation.[3]
Carry the same evidence through inventory, remediation, procurement, and exceptions.
| Risk-program activity | Scanning contribution | Penetration-testing contribution | Resulting evidence | Accountable owner |
|---|---|---|---|---|
| Inventory and supplier review | Matches components to deployed versions | Checks interfaces and deployment assumptions | Device record, validated SBOM, support dates, unresolved disclosures | HDO clinical engineering |
| Security assessment | Supports clinical-risk triage | Validates priority attack paths | Scan scope, inputs, sources, and false-positive decisions; tester qualifications, scope, duration, restrictions, and impact | HDO cybersecurity |
| Remediation and verification | Checks updates or reduced exposure | Retests affected paths and controls | Remediation status, retest results, device-performance checks, remaining limitations | Manufacturer; HDO clinical engineering |
| Procurement and onboarding | Flags unsupported or vulnerable components | Assesses proposed connectivity | Supplier commitments, evidence gaps, deployment conditions | HDO procurement |
| Exceptions and oversight | Identifies unresolved findings | Identifies untested paths and uncertainty | Clinical-impact assessment, approval, review date, mitigation commitments | HDO risk approver; compliance |
Using Results for Procurement and Deployment
Require current SBOMs, security-test summaries, support dates, and remediation commitments before purchase and go-live. Manufacturers own component data, product security testing, mitigation records, and updates. HDOs own local inventory, exposure, placement, advisory tracking, and remediation coordination.
Use this evidence to set segmentation, access restrictions, monitoring, or deployment limits. An exception is not closure: record clinical consequences, compensating controls, an owner, an approver, a review date, and triggers for reassessment. Before accepting manufacturer test results, confirm that the test conditions match the proposed deployment.
Coordinating Risk With Censinet RiskOps™
Keep testing evidence, ownership, and exceptions together in a shared risk record. Use Censinet RiskOps™ to organize evidence, assign owners, track remediation and retest status, manage exceptions, and document deployment decisions.
Conclusion: Repeat Scans and Test Attack Paths
Scanning finds known component weaknesses; authorized penetration testing checks attack paths and tests controls. Rescan after advisories or component updates. Retest targeted attack paths after changes to interfaces, exposure, or defenses, with testing frequency based on risk.[1][15][16]
Use both methods together, and prioritize action based on deployment context and potential patient harm. Test representative nonproduction devices, staying within approved rules of engagement and safety safeguards.[7][15]
A patch alone does not resolve risk. Confirm the fix on the deployed build, retest affected attack paths, and check clinical function.[14][16] If risk remains, document the controls, accountable owner, approval, and trigger for reassessment.[14]
FAQs
How do I choose which device vulnerabilities to pen test?
Start with existing risk assessments and threat modeling to identify critical assets that handle protected health information or support life-critical functions. Use vulnerability scan results to spot clusters of known issues. Then, select targets to test whether those vulnerabilities can be exploited in an actual clinical setting.
Focus on high-risk network interfaces, APIs, and authentication paths. Match the depth of testing to each device’s risk level and the potential impact on patient safety.
What if my device vendor cannot provide an SBOM?
Document the SBOM gap in your risk management files and explain your decision in line with FDA expectations. Use other methods, such as binary static analysis, to decompile firmware code and identify components, libraries, and potential vulnerabilities.
Apply compensating controls, such as network segmentation, to reduce risks. Document these measures to show your commitment to cybersecurity throughout the device’s lifecycle.
When should I accept device risk instead of patching?
You may accept device risk instead of patching for vulnerabilities that are non-exploitable or low severity, provided you have formal, documented justification and approved compensating controls.
For legacy or critical systems that can’t be patched or scanned, work with vendors and biomedical engineering teams to put safeguards in place, such as network segmentation or added monitoring. Document each risk acceptance in risk management files. Name an owner, explain why updates aren’t feasible, and define what will trigger reassessment.
