
A clean SAST scan does not prove a medical device is secure. I recommend using these 7 methods to check code without running it, then verifying fixes in the release build with targeted runtime tests.
- Rule-based scanning: Check for known coding weaknesses.
- Data-flow analysis: Follow values across modules to spot missing checks.
- Taint analysis: Trace untrusted input to sensitive operations.
- Binary and bytecode review: Inspect compiled software, firmware, and supplier components.
- Code pattern matching: Flag risky APIs, exposed secrets, and unsafe settings.
- Control-flow and path analysis: Check security gates, state changes, and failure paths.
- Manual source and architecture review: Check design assumptions and gaps that tools miss.
Quick Comparison
| Method | Main question |
|---|---|
| Rule-based scanning | Does the code violate a selected rule? |
| Data-flow analysis | Where does a value go, and what checks apply? |
| Taint analysis | Can untrusted input reach a sensitive operation? |
| Binary and bytecode review | What risks appear in the shipped artifact? |
| Code pattern matching | Does the code contain a known risky construct? |
| Control-flow and path analysis | Can a path bypass a required security check? |
| Manual review | Do the code, design, and device context agree? |
My approach: review the design early, scan code during development, and inspect release artifacts before deployment. Keep build IDs, tool settings, decisions, and retest results so each finding can support device-specific risk review.
<u>Scanner severity is not patient impact.</u> Assess effects on care, device function, and patient data separately. Recheck after updates, and give healthcare teams version-specific risk information for local deployment decisions.
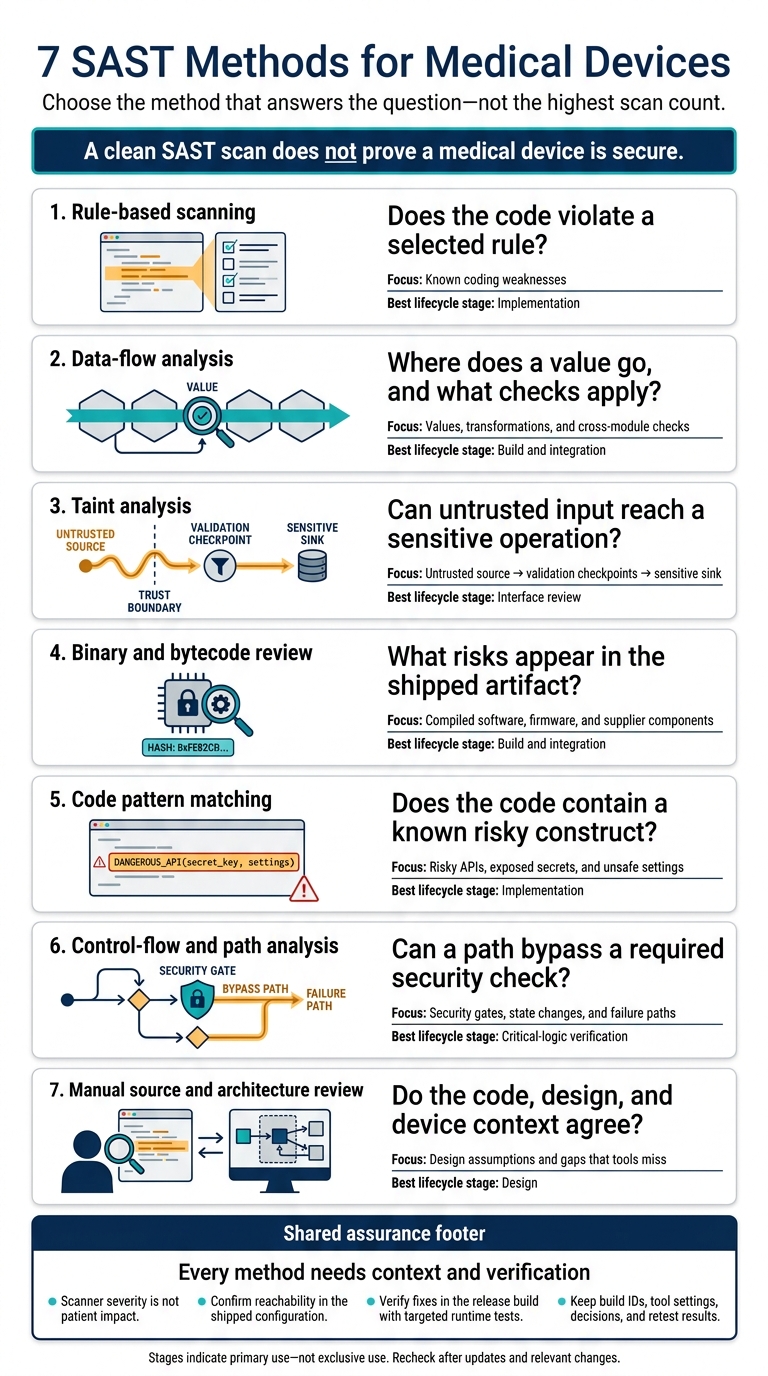
7 SAST Methods for Medical Devices
SAST in Medical Device Security
Use the threat model to focus static review on trust boundaries and critical code paths: network input handling, clinician authentication, update authorization, and cryptographic-key storage. Feed findings back into secure development before integration.[1][2] This focus guides which static method to use next.
Keep the technical finding separate from its possible effects on patients and care. Record the weakness, affected component, reachable interface, and attack prerequisites. Then assess potential effects on patient safety, device performance, PHI, and care delivery. A scanner’s severity rating does not determine patient impact. That requires device-specific analysis.[1][7]
For U.S. cybersecurity risk reviews, link each finding to its threat-model element, mitigation, verification result, risk before and after mitigation, and safety-risk assessment. Assign an owner to unresolved findings, and document why any residual risk is accepted.[8]
Rule-based scans, data-flow analysis, taint analysis, binary review, code pattern matching, and control-flow/path analysis each provide different evidence about the same code path. Manual review adds context that automation misses - for example, whether a diagnostic interface is enabled in production or a protection blocks a reported path. Choose methods based on architecture, code criticality, and available evidence.[5] The next sections explain what each method reveals.
Static review cannot fully verify authentication, update authorization, timing, or fault handling.[1] Use it to find issues, then check runtime behavior with targeted testing.
sbb-itb-535baee
1. Rule-Based Code Scanning
Artifacts and Scope
Configure the scan to match the device’s languages, compiler settings, target architecture, and release configuration. Include firmware and application source, build scripts, configuration files, source-available third-party components, shippable test utilities, and security-relevant interface definitions.
Define the scope by product version, processor or operating-system variant, and safety or security boundary. Record the analyzer version, rule-set version, scan profile, source commit, and rationale for exclusions. For C and C++, focus on external-input handling, device communications, authentication, updates, logging, cryptography, memory, and safety-critical control paths.
Use CWE categories as a shared vocabulary for weaknesses. Document a baseline of CERT C and MISRA C/C++ checks that matches the device’s language and risk profile. Map selected rules to product risks and requirements. MISRA compliance alone does not cover every security concern.[10] Use this baseline to distinguish routine rule hits from issues that need deeper flow analysis.
Typical Findings
A rule-based scan can flag:
- Memory-safety errors, null dereferences, and integer overflow or truncation: These may affect patient safety, availability, or device integrity.
- Unchecked returns and resource leaks: These may affect device integrity or availability.
- Hard-coded credentials, weak hashing, and debug-log exposure: These may affect privacy or device integrity.
NIST’s static-analysis methodology includes representative checks involving CWE-121, CWE-259, CWE-252, CWE-328, CWE-534, and CWE-561.[9] Record the rule identifier and affected component for each finding.
An alert is not yet a confirmed defect. It needs review. Rule-based scans identify known weakness patterns; data-flow and taint methods help determine whether those patterns are reachable.
Lifecycle Use
Use rule-based scanning as a first-pass screen for known weakness classes. Run a fast, agreed-upon rule profile on every pull request or merge request. Run the full profile at scheduled intervals, major branch merges, and release candidates.
Earlier scans catch new defects before integration. The pipeline can block new critical findings while tracking approved legacy issues. Keep severity, applicability, deviations, and required justifications in version-controlled policy files.
Before relying on the analyzer, test its applicable checks against files containing known violations, as recommended in MISRA Compliance:2020.[11] Send confirmed or ambiguous findings for data-flow, taint, or path analysis.
Risk-Review Evidence
Give each finding an explicit disposition: remediate, false positive, approved deviation, defer with an approved deadline, or accepted residual risk. Before closing an alert, review the relevant code path, configuration, compiler behavior, input constraints, and test evidence.
Retain the scan metadata recorded above, the full findings report, triage decisions, deviation approvals, remediation tickets, and before-and-after code diffs.
A suppression is not a fix. Document its scope, rationale, and review trigger. For MISRA or CERT C deviations, identify the rule, rationale, affected files, compensating controls, approving authority, and expiration or review trigger.
Verify fixes by rerunning the same rules on the corrected revision and reviewing the code diff. Run relevant regression, unit, integration, or hardware-in-the-loop tests when appropriate.
For buffer-handling issues, check boundary lengths, malformed inputs, maximum supported payloads, and error-path behavior. For credential or logging issues, verify the release binary and production configuration - not just the source file. Preserve before-and-after results, the reviewer’s name, and the verification date.
2. Data-Flow Analysis
Use data-flow analysis when a rule-based scan flags a weakness and you need to confirm whether the path reaches a security-critical sink.
Artifacts and Scope
Data-flow analysis traces where values start, how they change, and where they end up in shipped code. Review source code, auto-generated code, dependencies, interfaces, and build settings to follow values through full call chains. Map trust boundaries and external interfaces with data-flow, call-flow, or swim-lane diagrams.
At each module interface, specify which module checks type, range, length, encoding, units, freshness, and authorization before a value is used.
Typical Findings
Focus first on flows into therapy controls, alarm settings, and protected patient-data stores - not just memory operations.
Look for checks that fail across modules: signed-to-unsigned conversion, allocation overflow, ignored authorization results, and stale pointers or use-after-free references.
Check both array bounds. An upper-bound check alone can still let negative indices through.
Lifecycle Use
Use data-flow analysis during integration, when parsers, middleware, firmware, OS services, and vendor libraries share values. This is where interface assumptions need checking. Repeat the analysis after protocol, dependency, or compiler changes, and run it against the production release candidate.
Record gaps in visibility where callbacks, indirect calls, assembly, proprietary libraries, hardware registers, auto-generated code, or interprocess messages hide part of a path. Cross-device flows need explicit interface models. Conservative assumptions can also flag paths that aren't possible.
Risk-Review Evidence
Keep a record of the value’s origin, transformations, path, checks, and final use. Confirm that the path is feasible in the shipped configuration before assigning risk.
After fixing the issue, rerun the affected flow analysis. As applicable, test minimum, maximum, negative, truncated, oversized, malformed, and unexpected-format inputs. Check that validation still holds after later conversions and that rejected inputs follow a safe error path on target hardware.
Link the evidence to the requirement, defect ticket, corrective action, verification test, and approval record. A clean flow report does not establish device safety; use the evidence to distinguish reachable defects from theoretical ones.
3. Taint Analysis
Taint analysis follows untrusted input from source to sink to check whether sanitization, validation, or authorization stops it before it reaches a sensitive operation. Use it when data-flow analysis shows a path, but you still need to verify that a safeguard blocks the input before the sink.
Artifacts and Scope
Define untrusted sources across wired and wireless interfaces, cloud channels, update paths, local service ports, removable media, serial interfaces, and IPC. Configure the analysis to follow data through callbacks, queues, wrapper functions, and other helper code.
Identify sensitive sinks, including firmware writes, command execution, authentication and privilege changes, configuration updates, file writes, logs, telemetry, and therapy-control interfaces.
Typical Findings
With sources and sinks defined, test whether validation actually breaks the attack path.
Look for command injection, path traversal, unsafe deserialization in update packages, buffer overflows caused by unvalidated packet lengths, privilege escalation through wireless commands, insecure configuration changes, and data leakage through logs or telemetry.
Length checks do not prove authorization. Likewise, a valid update format does not prove authenticity. Check that signature verification protects update paths and that decoding or decompression cannot bypass earlier validation.
Lifecycle Use
Focus taint analysis on interfaces most likely to carry attacker-controlled input. Run it when parsing or interface code changes, and repeat it after protocol, firmware, diagnostic, or third-party updates.
Before release, confirm which attack paths are reachable in shipped code and enabled interfaces. Proprietary functions that the tool does not model can hide paths, so pair static findings with manual review and targeted testing.
Risk-Review Evidence
Keep source-to-sink traces that show trust-boundary crossings and validation checkpoints, along with evidence that each path is reachable or blocked. Record exclusions, device-specific severity rationale, remediation status, and verification results.
State exclusions clearly so reviewers can tell the difference between an assessed path and one the tool could not follow.
4. Binary and Bytecode Review
Artifacts and Scope
Review the exact release artifacts: firmware images, bootloaders, executables, shared libraries, mobile packages, and managed bytecode. Use this method when source scanners can’t inspect proprietary or third-party components.
Record each artifact’s version, build number, target architecture, signing status, and cryptographic hash. Note any stripped symbols, encryption, or packing that limits what you can inspect.
Typical Findings
Check for embedded credentials, unexpected dependencies, unsafe function calls, enabled debug features, and missing protections, such as stack canaries or non-executable memory. Compare the dependencies you find against the SBOM and build manifest.
A library signature match is a lead, not proof. Confirm the library’s identity and version using supplier records and build metadata, including any backported fixes.
Lifecycle Use
Inspect vendor binaries before integration, in release candidates, and in the final signed artifact. Repeat the analysis after supplier updates, compiler changes, security patches, or new vulnerability disclosures.
To verify a fix, compare the pre-fix and post-fix files, along with the affected instruction ranges or bytecode methods. Then run targeted lab tests. A changed hash proves a change - not a fix.
Risk-Review Evidence
Keep reports linked to artifact identifiers, tool and ruleset versions, scan settings, dependency findings, and verification results. Label each finding as confirmed, probable, suspected, or not determined.
Link each finding to its component or address range, affected device versions, potential safety impact, mitigation, and owner. State what remains unknown and which supplier evidence or tests you still need. Don’t treat incomplete visibility as a secure result.
5. Code Pattern Matching
Artifacts and Scope
Use pattern matching to screen shipped medical device firmware, software, and update artifacts for known risky constructs. It flags risky patterns but does not trace data or execution flow. Scan shipped source, build scripts, configuration, and generated code.
Maintain a version-controlled catalog that records each pattern’s match condition, language, weakness, safer alternative, and exclusions. Prefer syntax-aware matching over text searches alone.
Typical Findings
Look for unsafe APIs, hardcoded credentials, weak cryptography, unsafe update logic, disabled certificate validation, and logging of PHI, authentication tokens, or private keys.
Review every match in context. Check whether the code is reachable, whether its inputs are trusted, what safeguards surround it, and whether it ships with the product. A keyword match alone does not prove exploitability. Use deeper flow or taint analysis when behavior crosses functions or a match may be reachable in the shipped build.
Lifecycle Use
Start with a repository-wide baseline scan, then scan changed code on every pull request. Block high-confidence secret findings and route ambiguous matches for review. Repeat checks on release-candidate artifacts and remediation commits.
Risk-Review Evidence
Save the search definition, repository and branch, commit or build ID, file path or binary offset, tool and rule versions, findings, and technical dispositions. Link confirmed issues to security requirements, device impact, remediation owners, and deadlines. Keep approved exceptions visible rather than silently suppressing them.
Verify that the replacement logic works - not just that the match has disappeared - and add a regression check. Removing exposed secrets is not enough: revoke or rotate them, then confirm that the old credentials can no longer authenticate. Preserve the remediation commit and retest results for risk review.
Carry confirmed matches into the next review step to validate reachability and paths.
6. Control-Flow and Path Analysis
After finding pattern matches, check whether the code can actually reach a protected operation.
Artifacts and Scope
Trace the state changes and authorization gates that lead to critical operations. Focus on decision points, state transitions, and guard logic - not value propagation.
Use call graphs, control-flow graphs, boot-chain and update-flow diagrams, and state diagrams to review authorization, startup, updates, error handling, and state transitions. Include alternate interfaces and recovery paths. For every transition, record the trigger, required authentication and authorization, safety conditions, and failure behavior.
Typical Findings
Look for privileged operations that code can reach before authentication or authorization during boot. Check for recovery branches that skip image verification and error handlers that leave service privileges active.
Each state transition must enforce its guard at execution time. A firmware image passing authenticity checks is not enough: the update must also be authorized for that device.[13]
Lifecycle Use
Review intended paths during architecture and threat modeling, then validate them during development. Repeat cross-component checks at integration and after any change to boot, updates, authentication, or recovery.[2]
Risk-Review Evidence
Keep a path inventory that links each critical operation to its entry points, security conditions, reviewed branches, and patient-safety impact. Record assumptions about boot ROM, hardware keys, and external services. Flag unresolved paths caused by interrupts, concurrency, dynamic dispatch, or unavailable source code.
Pair important paths with negative authorization, invalid-signature, rollback, interrupted-update, and fault-injection tests. Record expected and observed outcomes. Link remediation and verification results to security requirements and safety hazards. Use static traces to define runtime tests; static review alone does not prove behavior.
Add each path finding to the medical device cyber risk management record, including its owner, disposition, and residual risk.
7. Manual Source and Architecture Review
Artifacts and Scope
Review source code against the architecture, trust-boundary, SBOM, configuration, and risk-control records for the exact device build. Compare the code with architecture and data-flow diagrams, interface specifications, threat models, cybersecurity requirements, and risk-control traceability. Include connected services and maintenance interfaces.
Human review checks whether an exposed interface is actually enabled in the shipped build - not just present in the source.
Typical Findings
Focus on shared administrative credentials, excessive service privileges, privilege boundaries, maintenance ports, exposed debug or service interfaces, and weak separation between safety-critical and noncritical functions.
Before dismissing a disputed alert, check callers, callees, configuration, build conditions, and reachability. Manually inspect custom parsers, generated code, and hardware-specific interfaces when tools cannot provide full coverage.
Lifecycle Use
Start manual review during requirements and architecture design to inform architecture decisions. Repeat it at integration and release, when the design, suppliers, or clinical function changes, and after connectivity changes or vulnerability disclosures.[2][7]
When code interacts with hardware or clinical behavior, pair an application-security reviewer with a device, safety, or embedded-systems engineer. Use manual review when automation cannot resolve reachability, build conditions, or hardware-specific behavior.
Risk-Review Evidence
Record the review date, build ID, reviewers and their qualifications, reviewed artifacts, scope exclusions, threat-model assumptions, findings, risk rationale, affected requirements, disposition, and approval status.
For fixes, retain the original evidence, changed code or diagrams, review approval, test and regression results, and confirmation that the released build includes the correction. For rejected or accepted findings, explain why the issue is not exploitable or why the residual risk is acceptable. Include compensating controls and stakeholder approval.
Link each finding to its effect on safety, effectiveness, and cybersecurity risk. AAMI TIR57:2016 (R2023) places cybersecurity risk management in the context of ISO 14971 safety-risk management.[14]
Use these records to route manual findings to the right development stage and risk-review workflow.
SAST Methods by Development Stage
The table below maps seven SAST methods to the artifacts and questions available at each stage of the device lifecycle. FDA’s Secure Product Development Framework supports cybersecurity work throughout that lifecycle.[2] Start with the narrowest method that answers the question. Move to another method only if the result remains unclear.
As the build matures, the same finding may move from one method to another.
| Method | Artifact | Best Lifecycle Stage | Main Findings | Review Evidence |
|---|---|---|---|---|
| Rule-based code scanning | Source code, configuration, rulesets | Implementation | Unsafe memory operations, hardcoded device credentials, insecure APIs, coding-standard violations | Tool/ruleset version; scope; triage; retest |
| Data-flow analysis | Intermediate representation, integration code | Build and integration | Patient data reaching logs or storage without permission; missing cross-module validation; misuse of device-control state | Analyzed build; reviewed data paths; integration assumptions; post-fix analysis |
| Taint analysis | Input definitions, parsers, message handlers, validation code | Interface review | Untrusted input reaching commands, files, or device controls without adequate checks | Source/sink definitions; propagation paths; validation checkpoints; unresolved paths; fix verification |
| Binary and bytecode review | Firmware images, executables, linked libraries, bytecode | Build and integration | Embedded secrets, exposed debug functions, vulnerable components, insecure build settings, source/binary mismatches | Artifact hash; SBOM/component inventory; findings; confirmation in the release image |
| Code pattern matching | Source files, patches, build scripts, configuration | Implementation | Risky coding patterns, PHI logging, insecure cryptography, organization-specific anti-patterns | Pattern definitions; match locations; exceptions; corrected-code and regression results |
| Control-flow and path analysis | Control-flow graphs, state machines, requirements-to-code traceability | Critical-logic verification | Bypassable authorization, unsafe device-state transitions, unreachable protections, incomplete failure handling | Critical requirements; reviewed paths; abnormal-path results; residual-risk decision |
| Manual source and architecture review | Architecture, threat model, interface specifications, selected source code | Design | Missing security requirements, flawed trust boundaries, unsafe device assumptions, architectural weaknesses | Reviewed artifacts; assumptions; reviewer qualifications; linked risks and dispositions |
Re-run the relevant methods when architecture, dependencies, compilers, or vulnerabilities change. Postmarket review must reassess the deployed version and update the risk analysis - not reuse the release report.[7]
At release, document that findings have been corrected or formally accepted. For patches, verify the fix and check for new defects. Keep reports, reviewed artifacts, finding dispositions, remediation verification, and raw tool output.[15]
Document the chosen method and carry each finding into risk review.
Document Findings for Risk Review
When a method produces a finding, add it to a risk management platform with evidence for triage, remediation, and residual-risk review. Record which SAST method found it and at what development stage.
This checklist supports risk review - it is not an eighth SAST method. Link the controlled finding register to release evidence rather than relying on the scanner report alone.[6]
- Reproduce the scan: Record the device, product, version, build or commit ID, artifact hash, target platform, scope inclusions and exclusions, compiler and linker versions, build flags, configuration, tool and ruleset versions, severity settings, custom rules, suppressions, report identifier, and scan timestamp.
- Track the decision: Give each finding an ID and record its affected component, code location, weakness category, owner, due date, disposition, and rationale. Link fixes to the related issue or change record. Keep approval evidence, corrected-build identifiers, retest results, regression evidence, and closure dates. Explain false positives, and set a reassessment deadline for deferred findings.[16]
- Approve remaining risk: Record affected device versions and assets, implemented controls, residual limits, acceptance criteria, accountable approver, approval date, monitoring requirements, and reassessment triggers. A scanner suppression is not risk acceptance.[4]
Prioritize findings based on exploitability, exposure, affected components and clinical functions, and clinical impact. Assess attack prerequisites, required access and privileges, reachable interfaces, and possible effects on patient safety, device performance, availability, PHI, clinical data integrity, and clinical operations. Record risk before and after mitigation, and flag issues that require device safety-risk assessment.[2][8]
Link each material finding to its threat model scenario, security or safety requirement, risk-control measure, verification step, and release or change decision. Make these links bidirectional so reviewers can move from a requirement to its evidence and back. Use the register to connect each finding to tests that confirm the fix and controls that remain in place.[6]
Pair SAST findings with device-level evidence: dynamic testing, interface and protocol testing, fuzzing, and dependency review. Confirm that the fix is present in the compiled image, unauthorized or malformed inputs are rejected, and security controls do not impair alarms, therapy delivery, availability, or recovery.[2][6]
Connect Manufacturer and Healthcare Risk Reviews
Manufacturer testing provides evidence about implementation; healthcare delivery organization (HDO) review determines whether the device fits local workflows, networks, integrations, and patient-data handling.[3] This division clarifies what evidence the manufacturer must supply and which decisions belong to the HDO.
During procurement, request the manufacturer’s security risk summary, documented residual risks, patch and update policy, and end-of-support date. Check that the evidence applies to the exact model and firmware or software release being purchased and is current as of the assessment date. Before deployment, review the local configuration, network exposure, and connected systems.
The manufacturer owns remediation and technical evidence. The HDO owns local exposure, update feasibility, downtime, and compensating controls. Involve biomedical engineering, security, privacy, network engineering, procurement, and clinical operations as a cohesive RiskOps team so mitigations do not disrupt patient care.[12] Use these responsibilities to define what evidence must be in place before clinical use.
Carry the same evidence set from procurement review into deployment control. Keep one device record in the HDO asset inventory, linked to the deployment owner, as the handoff point for vendor evidence, documented findings, residual risk, and deployment decisions. Make purchase and deployment conditional on the evidence or mitigation required by procurement terms. Reassess after firmware updates, new vulnerabilities, integration changes, or end-of-support notices.
Conclusion: Combine Methods and Keep Evidence
Choose methods based on device risk, not scan count. Use rule-based scans and pattern matching for broad screening. Turn to data-flow, taint, control-flow, and path analysis, along with binary and manual review, when external input, reachability, third-party code, or trust boundaries matter.[1][17]
Match each method to the development stage. Review architecture early, automate source checks during implementation, and inspect compiled artifacts before release. Rerun the relevant checks after patches or changes to compilers, dependencies, or configurations.[1][2]
For every confirmed finding, keep evidence that others can reproduce and use for risk review. Record the tool version, rules, configuration, build ID, scope, exclusions, corrective commits, retest results, and approvals.[18] Verify fixes on the deployment release - not a developer branch - and link findings to release approval or residual-risk review.
Static review is one layer of assurance, not the full verification package. It supports the security and safety case but does not replace runtime testing, clinical risk analysis, or postmarket surveillance.[17]
FAQs
How do I choose SAST methods for my device?
Choose Static Application Security Testing (SAST) methods based on your development stage and whether you have access to source code. During implementation, add SAST to your CI/CD pipeline to catch insecure patterns on every commit.
Use source analysis to check for memory-safety issues and logic flaws. When source code isn’t available, use binary analysis instead.
Match your methods to your device’s threat model, regulatory requirements such as IEC 62304, and safety-critical functions.
Which SAST findings should delay a device release?
To meet regulatory requirements and keep devices safe, block releases until new high-severity findings are fixed. Also block releases for vulnerabilities that could affect device function, data integrity, availability, or patient safety until they’re fixed.
Non-exploitable, low-severity findings may be accepted with formal, documented justification and approved compensating controls. All other findings need a named owner, a target fix version, and verified retest results before release.
How can I assess firmware without source code?
Start with a firmware dump, or convert the image to raw binary. Use binwalk to check entropy, find file system markers, and extract embedded files.
Next, use Software Composition Analysis (SCA) to identify libraries and components. Alternatively, use binary static analysis to decompile code and scan for unsafe function calls, hardcoded credentials, or buffer overflows. Keep a dynamic software bill of materials (SBOM) to track vulnerabilities.
