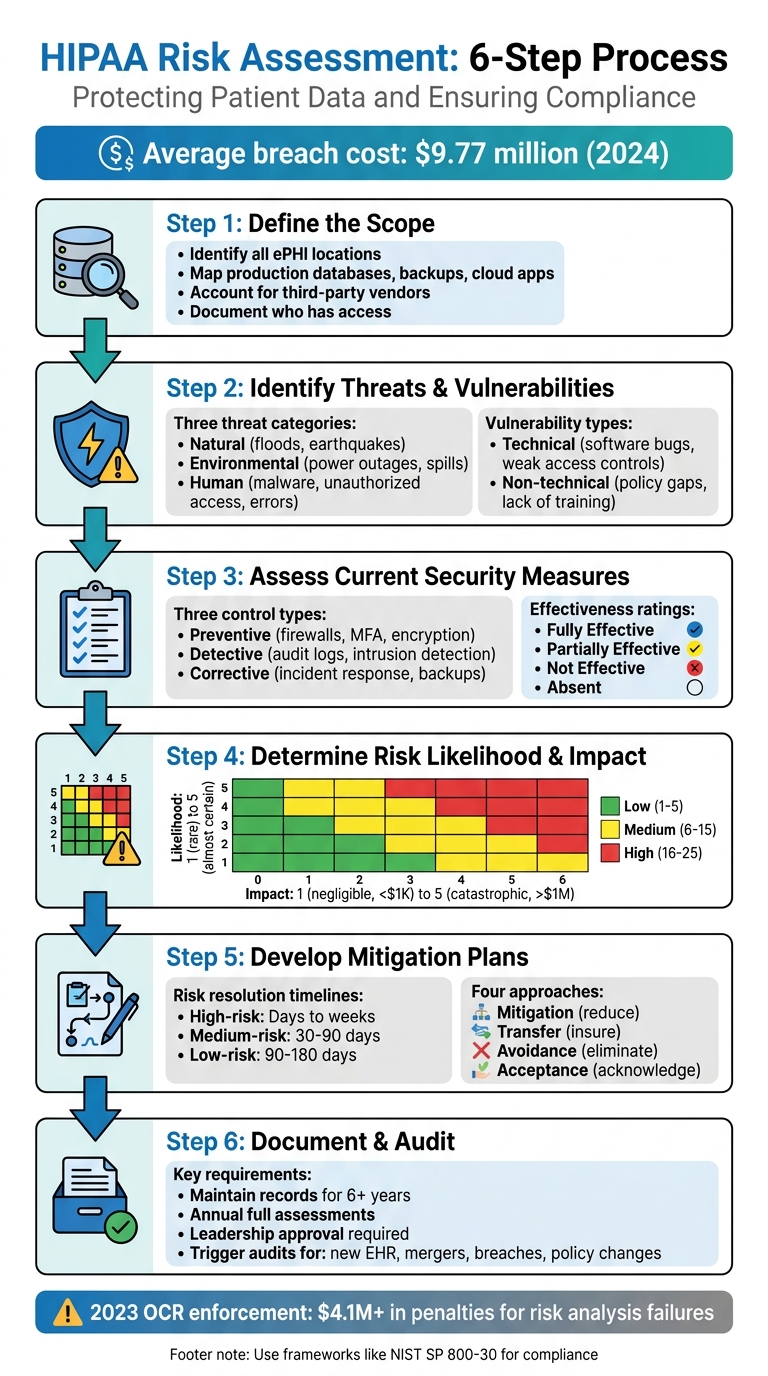
HIPAA Risk Assessment: 6-Step Process
Post Summary
Protecting patient data is a legal requirement, not just a best practice. A HIPAA risk assessment helps healthcare organizations identify and address threats to electronic Protected Health Information (ePHI). This 6-step process ensures compliance with federal regulations and reduces the risk of costly breaches, which averaged $9.77 million per incident in 2024. These cyberattacks in healthcare often disrupt clinical applications and patient care.
Here’s a quick breakdown of the process:
- Define the Scope: Identify all locations, systems, and third parties handling ePHI.
- Identify Threats and Vulnerabilities: Catalog risks like natural disasters, human errors, and system weaknesses.
- Evaluate Security Measures: Test how well current controls protect ePHI.
- Assess Risk Likelihood and Impact: Use a risk matrix to prioritize threats.
- Develop Mitigation Plans: Assign timelines and responsibilities for addressing risks.
- Document and Audit: Keep detailed records and schedule regular audits to stay compliant.
HIPAA Risk Assessment 6-Step Process Flowchart
OCR Webinar: The HIPAA Security Rule Risk Analysis Requirement
sbb-itb-535baee
Step 1: Define the Scope of Protected Health Information (PHI)
The first step in a HIPAA risk assessment is pinpointing exactly what needs protection. According to the HIPAA Security Rule, your analysis must include all electronic protected health information (ePHI) that your organization creates, receives, maintains, or transmits - no matter where it's stored or how it's handled[2]. The HHS Office for Civil Rights explains:
"An organization's risk analysis should take into account all of its e-PHI, regardless of the particular electronic medium in which it is created, received, maintained or transmitted or the source or location of its e-PHI."[2]
Identifying Internal and External PHI Sources
Start by mapping out every location where ePHI resides. This includes production databases, backup systems, email platforms, ticketing tools, and cloud-based applications[3]. Don’t overlook portable media like CDs, DVDs, smart cards, or PDAs[2].
You’ll also need to account for third-party vendors, business associates, and subprocessors that handle ePHI on your behalf[3][5]. These could include billing services, IT providers, cloud storage vendors, or consultants with access to patient data. It’s a good idea to interview stakeholders to uncover any shadow IT - such as personal devices or unauthorized apps - that might unintentionally manage PHI[3].
A key part of this process is identifying who has access to ePHI at every stage. This typically involves roles like database and application administrators, backup administrators, customer support teams, IT staff, and your designated Security Officer[3][4]. Instead of assigning responsibilities to specific individuals, link them to roles (e.g., "DevOps Lead") to ensure continuity when staff changes occur[4].
Clearly defining the scope of ePHI lays the groundwork for a thorough risk analysis. Once you’ve completed this mapping, you can move forward with established risk management frameworks to ensure nothing is missed.
Using Frameworks for Complete Scoping
Leverage NIST SP 800-66 to ensure you’ve covered all critical assets[2]. While NIST was initially designed for federal agencies, it’s widely recognized as a standard for securing ePHI[2]. Although the HIPAA Security Rule doesn’t require a specific framework, using one like NIST demonstrates due diligence and provides solid evidence during OCR audits[5].
Make sure to document everything - HIPAA requires you to maintain records for at least six years[3]. Update your ePHI mapping whenever there are changes, such as mergers, new office locations, or the introduction of applications that handle ePHI[3].
Step 2: Identify and Document Threats and Vulnerabilities
Once you've pinpointed where ePHI resides, the next step is to identify potential risks. According to NIST, a threat refers to any potential action - whether accidental or intentional - that takes advantage of a vulnerability. A vulnerability, on the other hand, is a flaw or weakness in security procedures, system design, implementation, or internal controls that could lead to a breach[2].
This step lays the groundwork for categorizing threats and vulnerabilities in greater detail.
Cataloging Threats
Threats generally fall into three categories: natural, human, and environmental.
- Natural threats include disasters like floods, earthquakes, and tornadoes[2].
- Environmental threats involve infrastructure issues such as power outages, chemical spills, or liquid leaks[2].
- Human threats require closer analysis. Intentional threats include network attacks, malware injections, unauthorized access to ePHI, and insider actions by disgruntled employees[2][7]. Unintentional threats stem from errors like accidental data deletion, incorrect data entry, or negligent actions that result in leaks[2][7].
It's important to differentiate between deliberate actions by malicious actors, such as hackers seeking to steal patient records, and accidental mistakes by staff. Each scenario demands tailored mitigation strategies[7].
After identifying potential threats, the next step is to evaluate the vulnerabilities that could allow these threats to compromise ePHI.
Documenting Vulnerabilities
Vulnerabilities can be divided into technical and non-technical categories:
- Technical vulnerabilities include issues like software bugs, unpatched systems, misconfigured firewalls, and weak access controls[2][7].
- Non-technical vulnerabilities cover gaps in security policies, lack of staff training, inadequate building security, and missing incident response plans[2][7].
To identify vulnerabilities, gather data by reviewing past security incidents or "near misses", conducting interviews with IT staff and end users, and thoroughly examining existing safeguards[2]. A helpful resource for this process is the HHS Security Risk Assessment (SRA) Tool (v3.6), which provides structured guidance for evaluations[6].
Start with an asset-based approach: make a complete inventory of all workstations, medical devices, and servers that handle ePHI. Once cataloged, assess what vulnerabilities could put these assets at risk[2][7]. This method ensures that no critical system is overlooked.
Step 3: Assess Current Security Measures
After identifying threats and vulnerabilities in Step 2, it’s time to evaluate how well your existing security measures hold up in practical, everyday scenarios. This isn’t just about reviewing policies on paper - it’s about seeing how controls perform when put to the test. As One Guy Consulting highlights:
"A tool‐generated review without expert analysis and customization is unlikely to satisfy OCR expectations." [8]
In other words, relying solely on automated tools won’t meet OCR standards. The urgency here is underscored by a staggering 180% year-over-year increase in exploitation of vulnerabilities as an initial access point, based on 2024 data [1].
Validating Security Controls
Start by grouping your safeguards into three categories based on their function:
- Preventive controls: These aim to stop issues before they happen (e.g., firewalls, multi-factor authentication, encryption).
- Detective controls: These help identify issues as they occur (e.g., audit logs, intrusion detection systems).
- Corrective controls: These address problems after they’ve occurred (e.g., incident response plans, data backups).
A thorough evaluation requires more than one method. Use vulnerability assessments, penetration tests, physical inspections, and staff interviews to uncover gaps between what’s documented and what’s actually happening. Audit logs can also reveal unauthorized access attempts or unusual activity. Organizations can further strengthen this process by using real-time portfolio risk management to benchmark their security posture against industry peers.
Once you’ve tested your controls, rate their effectiveness:
- Fully Effective: Fully operational and recently tested.
- Partially Effective: In place but with gaps in setup or coverage.
- Not Effective: Exists only on paper or is outdated.
- Absent: No control exists for the identified risk.
Focus on how well controls work in practice, not just how they look on paper. Overestimating effectiveness can lead to a false sense of security. A common blind spot is audit logging - while many organizations enable it, few review the logs consistently. This oversight often comes up during OCR audits.
Aligning Controls with HIPAA Requirements
Next, compare your safeguards to the HIPAA Security Rule’s "required" and "addressable" implementation specifications. This gap analysis is critical for identifying compliance issues that could lead to penalties. For example, the maximum annual fine for uncorrected willful neglect violations under HIPAA is approximately $1.9 million [1].
To ensure your evaluation is defensible in an audit, use established frameworks like NIST SP 800-30 Rev. 1 or the NIST Cybersecurity Framework. If you’re a smaller practice, the HHS-provided Security Risk Assessment (SRA) Tool is a free resource that can guide you through this process.
For risks that can’t be fully addressed due to budget or operational constraints, document a formal "risk acceptance" decision signed by leadership. This step can protect your organization from being accused of "willful neglect" during regulatory reviews. Remember to retain all records related to these assessments for at least six years, as required by HIPAA [1].
Step 4: Determine Risk Likelihood and Impact
After evaluating your security controls, the next step is to quantify and prioritize risks. This ensures that your mitigation efforts align with HIPAA requirements. The goal here is to accurately assess both inherent risk (before controls) and residual risk (after controls). This approach ensures your HIPAA assessment is based on concrete evidence rather than assumptions.
This step aligns with the "reasonable and appropriate" standard outlined in 45 CFR § 164.306 [9].
Using a Risk Rating Scale
To quantify risks, apply a 5×5 risk matrix. Here’s how it works:
- Likelihood: Rated from 1 (rare, less than 1% annual chance) to 5 (almost certain, over 90% annual chance).
- Impact: Rated from 1 (negligible, less than $1,000 loss) to 5 (catastrophic, over $1,000,000 loss or severe reputational damage).
Multiply the likelihood and impact ratings to calculate a risk score. For instance:
- If phishing attacks targeting employee emails have a likelihood of 4 (likely, due to insufficient training) and an impact of 5 (catastrophic PHI exposure), the inherent risk score would be 20. This places it in the high-risk category.
- After implementing controls like multi-factor authentication and security awareness training, the likelihood might drop to 2. This reduces the residual risk score to 10, which moves it to the medium-risk category.
Documenting your assumptions (e.g., "Likelihood based on 2023 Verizon DBIR phishing rates") is crucial to making your analysis defensible during audits. These scores help you prioritize risks effectively and focus resources where they matter most.
Prioritizing Risks
Once you’ve calculated risk scores, organize them visually to set clear priorities for mitigation. Use a simple color-coded system:
- Low (1–5): Green
- Medium (6–15): Yellow
- High (16–25): Red
High-risk items (red) should receive immediate attention. For example, the 2023 Change Healthcare breach, which exposed data of one-third of Americans and led to $2.3 billion in losses, highlights the dangers of neglecting third-party vendor risks. Organizations that used a matrix-based approach to prioritize supply chain vulnerabilities after this breach saw a 60% reduction in residual risks through targeted audits [9].
To make prioritization clear, consider tools like heat maps or Pareto analysis (the 80/20 rule). These visual aids help pinpoint the risks that account for the majority of your exposure, allowing you to focus mitigation efforts where they’ll have the greatest impact.
Step 5: Develop and Implement Mitigation Measures
After prioritizing your risks, it's time to shift gears and create a solid management plan. Ignoring risks or leaving them unaddressed isn’t an option - it can lead to serious consequences. Each risk you've identified should be tackled using one of four approaches: mitigation, transfer, avoidance, or formal acceptance. Failing to document or address risks signals neglect. To stay organized and proactive, classify each risk and establish clear timelines for resolving them.
Classifying and Addressing Risks
Every risk needs an assigned owner and specific criteria for success. Here's how to approach different levels of risk:
- High-risk findings: These include critical issues like unencrypted electronic protected health information (ePHI) or ransomware vulnerabilities. These risks should be resolved quickly, ideally within days to weeks.
- Medium-risk findings: Examples include outdated software patches or gaps in employee training. These should be addressed within 30 to 90 days.
- Low-risk findings: These might involve minor policy changes or non-critical system tweaks. These can be incorporated into your ongoing security program over 90 to 180 days [1].
For risks that can’t be resolved due to constraints, document a formal risk acceptance decision signed by leadership. This step not only protects your organization during audits but also shows that decisions were made thoughtfully, not overlooked.
Setting Implementation Timelines
Once risks are classified, assign realistic timelines for addressing them based on their severity. Focus your resources on vulnerabilities that are most often flagged in OCR enforcement actions, such as unencrypted portable devices and weak access controls. To ensure your approach stands up to regulatory scrutiny, align your remediation efforts with NIST SP 800-30 Rev. 1 guidelines.
Be prepared to adjust your timelines as conditions evolve. For instance, mergers, new electronic health record (EHR) systems, or recent security incidents may require an immediate reassessment and reallocation of resources. Document every decision thoroughly and maintain records for at least six years. Lastly, make sure every corrective action has clear accountability - delays can lead to serious regulatory risks and consequences.
Step 6: Document and Conduct Regular Audits
The HIPAA Security Rule (45 CFR §164.316(b)) mandates that organizations keep detailed records of policies, procedures, and actions tied to risk assessments for at least six years. These records are crucial as they often serve as key audit evidence when the Office for Civil Rights (OCR) conducts investigations.
Documentation Practices
Think of documentation as your compliance safety net. It should include the following:
- A scope statement outlining all systems managing electronic protected health information (ePHI)
- A documented methodology, such as NIST SP 800-30, to identify threats
- A threat and vulnerability inventory , including third-party risk management for external vendors
- A detailed security control evaluation
- Quantified risk ratings with clear supporting rationale
- A prioritized risk register
- A risk management plan with timelines and assigned responsibilities
- Records of leadership approval
- A risk acceptance rationale for any unresolved risks
"The quality and depth of your documentation matters as much as the fact that an assessment was performed." – Bellator Cyber [1]
To show continuous compliance, maintain a version history of your documentation. If certain risks remain unaddressed, ensure leadership formally acknowledges and approves these decisions. This level of detail not only supports compliance but also ensures you're prepared for future audits.
Establishing an Audit Schedule
Once your risk assessment is documented, create a structured audit schedule. Conduct a full risk assessment annually, as recommended by OCR. Additional audits should be triggered by significant events, such as:
- Launching a new electronic health record system
- Merging with another organization
- Experiencing a security breach
- Updating remote work policies
In 2023 alone, OCR enforcement actions resulted in over $4.1 million in penalties, with failures in risk analysis frequently highlighted [1].
Make sure all records are retained for the required six-year period, with each assessment and risk management plan reviewed and signed by leadership. This demonstrates a proactive and ongoing commitment to HIPAA compliance.
Using Risk Management Tools for Efficiency
Conducting a HIPAA risk assessment manually can take a lot of time, especially in environments that deal with complex Protected Health Information (PHI) systems. As discussed earlier, the risk analysis process is essential, but advanced risk management tools can significantly speed things up and help maintain compliance over time. Automated platforms, like Censinet RiskOps™, tackle the inefficiencies of manual assessments by removing repetitive tasks. This allows teams to complete detailed assessments in a fraction of the time - weeks instead of months [9].
Streamlining Risk Assessments with Censinet RiskOps™
Censinet RiskOps™ simplifies the process by automating tasks such as data collection from various sources, standardizing vulnerability documentation, and calculating risk scores [9]. It supports automated assessments for frameworks like NIST CSF 2.0 and the HHS Healthcare and Public Health Sector Cybersecurity Performance Goals (HPH CPGs).
One standout feature is the HPH CPG Dashboard, which automatically aligns existing NIST CSF 1.1 and Health Industry Cybersecurity Practices assessments with the 10 Essential and 10 Enhanced CPGs. This helps pinpoint compliance gaps. The platform then provides clear, step-by-step action plans to address these gaps, assigning tasks to internal stakeholders and tracking progress - all within the system.
As previously mentioned, monitoring third-party access to PHI is critical. Censinet RiskOps™ takes this further by centralizing vendor risk assessments. This ensures not only your organization but also your business associates and supply chain partners meet HIPAA security standards, maintaining visibility across the entire network [9].
Supporting Compliance and Operations
Censinet RiskOps™ also includes cybersecurity benchmarking tools, which allow organizations to measure their security controls against established healthcare industry standards [9]. This comparison highlights areas where your security posture may fall short, helping you make informed decisions about resource allocation and providing justification for cybersecurity investments to leadership.
The platform keeps a detailed audit trail, documenting every assessment activity, finding, and remediation step. Each entry is timestamped, and historical versions are preserved, ensuring continuous compliance monitoring [9]. With audit-ready reporting capabilities, it becomes easier to communicate your compliance status to Boards, regulators, and auditors, simplifying the entire process.
Conclusion
Conducting a structured HIPAA risk assessment plays a central role in maintaining compliance. The Office for Civil Rights has consistently emphasized this through its enforcement actions. In fact, failing to perform a thorough risk analysis is one of the most frequent issues they cite, with penalties ranging from tens of thousands to millions of dollars [8]. By following the six-step process detailed in this guide, you're doing more than just meeting regulatory requirements - you're actively protecting patient data.
Maintaining a regular schedule for risk assessments is equally important. Organizations that reassess risks annually, or whenever significant changes occur, are better equipped to handle new threats and adapt to growth [4]. Assign control ownership to roles rather than individuals, implement quality checkpoints before audits, and ensure risk findings influence budget planning and vendor decisions [4][8]. This proactive approach strengthens your security stance and ensures compliance remains an ongoing effort.
Tools like Censinet RiskOps™ can make this process more efficient by automating data collection and standardizing documentation, cutting assessment timelines from months to weeks. Additionally, the HPH CPG Dashboard simplifies compliance monitoring and documentation tasks [8].
When it comes to remediation, prioritize addressing critical risks immediately, high risks within 30–90 days, and medium risks within 6–12 months [8]. Ensure that any formal risk acceptance decisions are documented and signed by leadership [1]. By adhering to this structured approach, your organization not only meets HIPAA requirements but also establishes a strong, resilient framework for safeguarding patient data.
Beyond compliance, a well-executed HIPAA risk assessment program inspires trust with enterprise clients, shortens sales cycles, and highlights your dedication to security in an ever-changing healthcare landscape [4].
FAQs
What systems and vendors should be included in a HIPAA risk assessment?
A HIPAA risk assessment needs to cover all systems and vendors that interact with electronic Protected Health Information (ePHI). This means evaluating:
- Cloud service providers that store or manage ePHI
- Third-party vendors, such as billing services or IT support teams
- Hardware and software systems used for processing or storing ePHI
- Subcontractors that handle patient data on behalf of your organization
The primary objective is to pinpoint vulnerabilities, ensure HIPAA compliance, and safeguard patient information effectively.
How do we score likelihood and impact to prioritize HIPAA risks?
To manage HIPAA risks effectively, organizations often use numerical scoring systems to evaluate two key factors: likelihood (the chance of an incident occurring) and impact (the potential harm it could cause). These scores are then multiplied to determine an overall risk score. Here are two common approaches:
- Likelihood × Impact: A straightforward method where higher scores highlight more critical risks.
- Risk matrices: A visual tool that helps prioritize risks by mapping them based on their scores.
Risks with higher scores demand immediate attention, while those with lower scores may only need monitoring or action at a later time.
How often should we run a HIPAA risk assessment, and what changes trigger a new one?
A HIPAA risk assessment isn't just a one-and-done task - it should be done every year to align with best practices. But that's not all. If your organization introduces new technology, updates its infrastructure, or alters workflows in a way that impacts the security of electronic Protected Health Information (ePHI), it's time for another assessment. Regular evaluations like these are critical for staying compliant and managing risks effectively.

